Change Risk Settings (IP)
In the AI Incident Prevention Change Risk settings, configure risk evaluation criteria for your organization, adjust the weightings of each risk category, configure the Change Risk Dashboard settings, and determine if risk assessments will be passed to your ITSM system.
Change Risk Settings are available in the web app at Operate > Change & Risk > Change Risk Settings.
Change Risk Settings
The Change Risk Settings page is divided into two tabs: Profiles and Global Settings.
Profiles Tab
In the Profiles tab, configure settings specific to individual change risk profiles. The following can be configured:
Change Risk Profiles
Assistance required
To create a new change risk profile, reach out to your BigPanda account team.
Use change risk profiles to create multiple, separate change risk configurations. Change risk profiles can be used to filter the Change Risk Dashboard. This is helpful for organizations that have teams that use different risk evaluation criteria.
Best practice
Most organizations configure between 1-6 change risk profiles. We recommend configuring no more than 10 change risk profiles per organization.
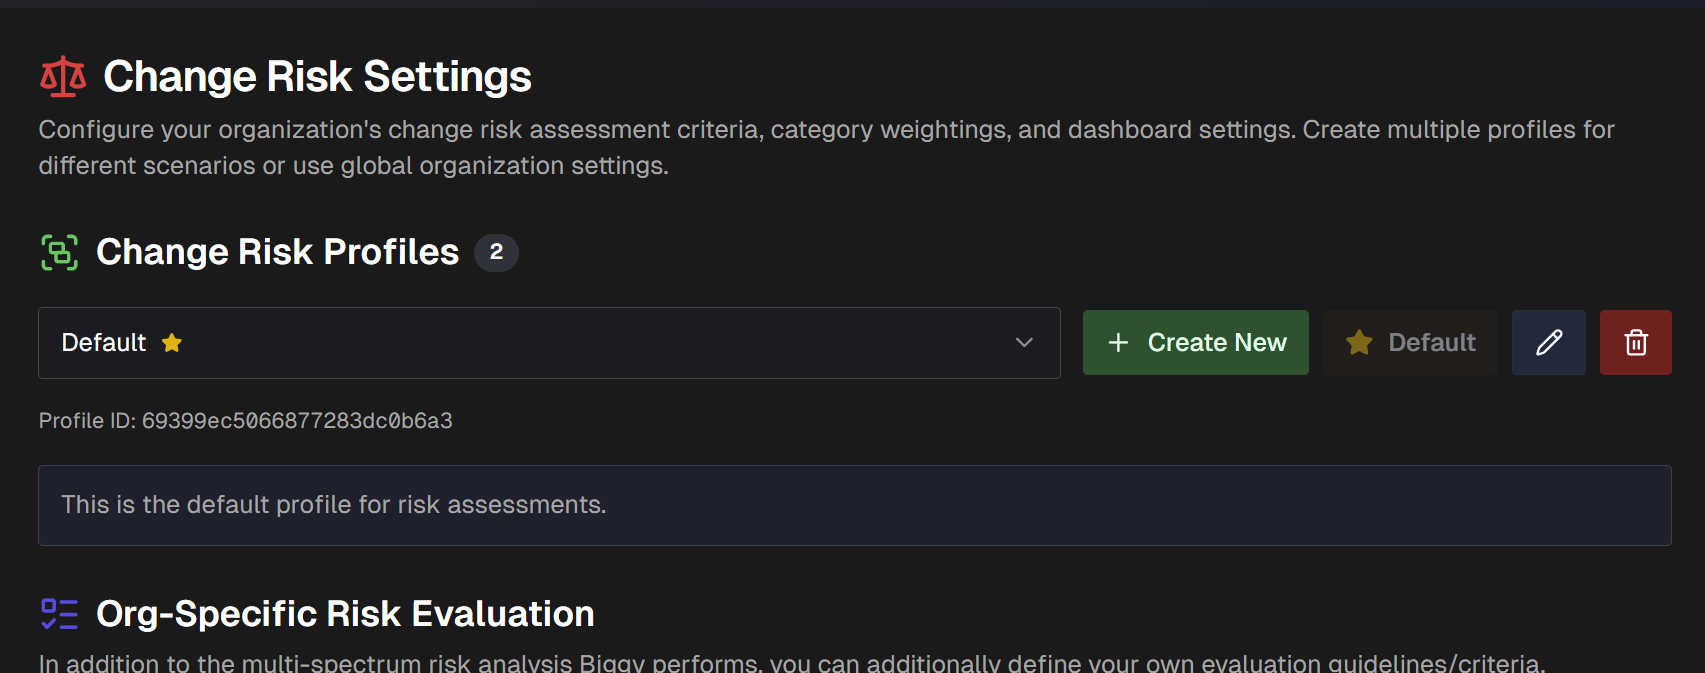
In Change Risk Settings, select a change risk profile to view or edit from the drop-down menu.
Best practice
When editing any of the change risk settings, always verify that you have the correct profile selected before saving any changes.
The default change risk profile has a star next to the name. The default change risk profile always opens first when you go to the change risk configuration page.
Create a New Change Risk Profile
To create a new change risk profile:
Click Create New.
In the Create New Profile window, populate the following information:
Profile Name - a unique, descriptive name for the change risk profile. (Limit 100 characters)
Description (Optional) - information about the profile's use or goals.
Copy from current single-mode settings - click the box to copy the current settings as a template for creating the new profile.
Click Create Profile.
(Optional) If you would like this profile to be the default that appears when you enter the configuration page, click Set as Default.
Manage Change Risk Profiles
To edit a change risk profile, click the Pencil icon, update the Profile Name or Description and click Update Profile.
To change the default change risk profile, go to the profile you'd like to set as default and click the Set as Default button.
To delete a change risk profile, click the Trash Can icon and select Confirm.
Org-Specific Risk Evaluation
In addition to the risk analysis AI Incident Prevention performs, you can also define your own evaluation criteria. The criteria defined in this section apply to the change risk profile you are configuring. You can set up different evaluation criteria for each change risk profile.
Under Evaluation Instructions, define additional evaluation guidelines for the LLM to follow.
Writing custom risk evaluation instructions
Write evaluation instructions the same way you would explain to a coworker what makes a change risky or not.
You can write these instructions in a free-form way or use if/else decision logic format.
Re-rate / Material Change Triggers
In the Re-rate / Material Change Triggers section, control when an already-rated change is automatically re-assessed after it is updated. These settings apply to the change risk profile you are configuring, so you can set different re-rate behavior for each change risk profile.
Separate from Risk Evaluation Instructions
These settings are separate from the Risk Evaluation Instructions in the Org-Specific Risk Evaluation section. Risk Evaluation Instructions tell Biggy how to score a change, while the settings here decide when an already-rated change should be re-rated after an update.
The following settings are available in this section:
Section | Description |
|---|---|
Re-rate / Material Change Instructions | Enter guidance for the re-rate decision. Use this field to describe which change updates should, or should not, trigger a re-assessment. For example, you can instruct AI Incident Prevention to treat attachment changes and implementation, test, or rollback plan updates as material, and to re-rate when uncertain. These instructions take precedence over the built-in re-rate guidance. |
Always re-rate when these ServiceNow fields change | List the fields from the ServiceNow To add a field, enter the field name (for example, When no fields are configured, field updates are evaluated by AI for materiality instead. |
Always re-rate on attachment add/remove | Toggle on to deterministically trigger a full re-rate whenever an attachment is added, removed, or has its metadata updated, without AI interpretation. |
Change Eligibility / Retrieval
In the Change Eligibility / Retrieval section, view which changes from ServiceNow are eligible for risk assessment for the selected change risk profile.
Read-only settings
Change Eligibility / Retrieval settings can only be updated by BigPanda. If you need to edit these settings, contact your BigPanda account team.
Change Eligibility/ Retrieval Control
Change Eligibility / Retrieval settings control which changes are retrieved from ServiceNow via a polling mechanism and then evaluated by the Change Risk Prediction engine. This retrieval is separate from Unified Data Connector filters.
The ServiceNow Query Filter field uses a query string to filter which changes from ServiceNow are indexed.
The Scheduled Start Field determines when changes are scheduled.
The Last Indexed Value displays the last sys_updated_on value that was successfully processed by the indexing service.
Incident Priority Filter
Use the Incident Priority Filter section to control which incident priority levels are considered in risk analysis.
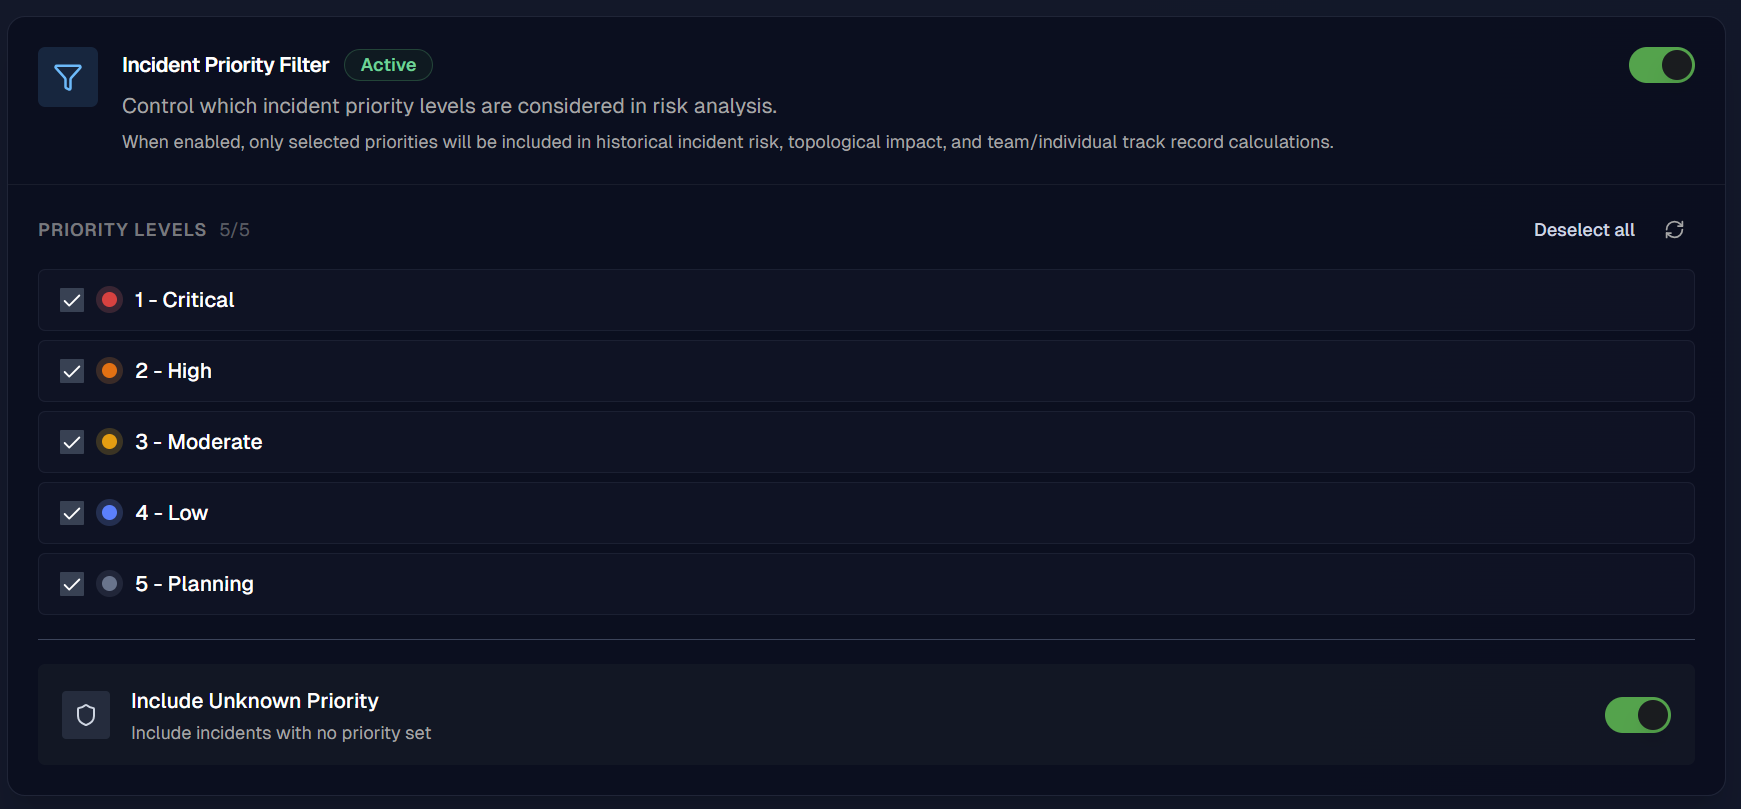
When enabled, only the selected priorities are included in historical incident risk, topological impact, and team/individual track record calculations. When disabled, all priorities are considered.
Use the checkboxes to select or deselect specific priority levels.
Toggle on Include Unknown Priority to include incidents without a priority set.
Custom Data Sources
Experimental feature
This functionality is in active development and considered experimental. We're continuously improving it based on user feedback and real-world usage patterns.
Use the Custom Data Sources section to select external data sources to include when using this profile to evaluate changes.
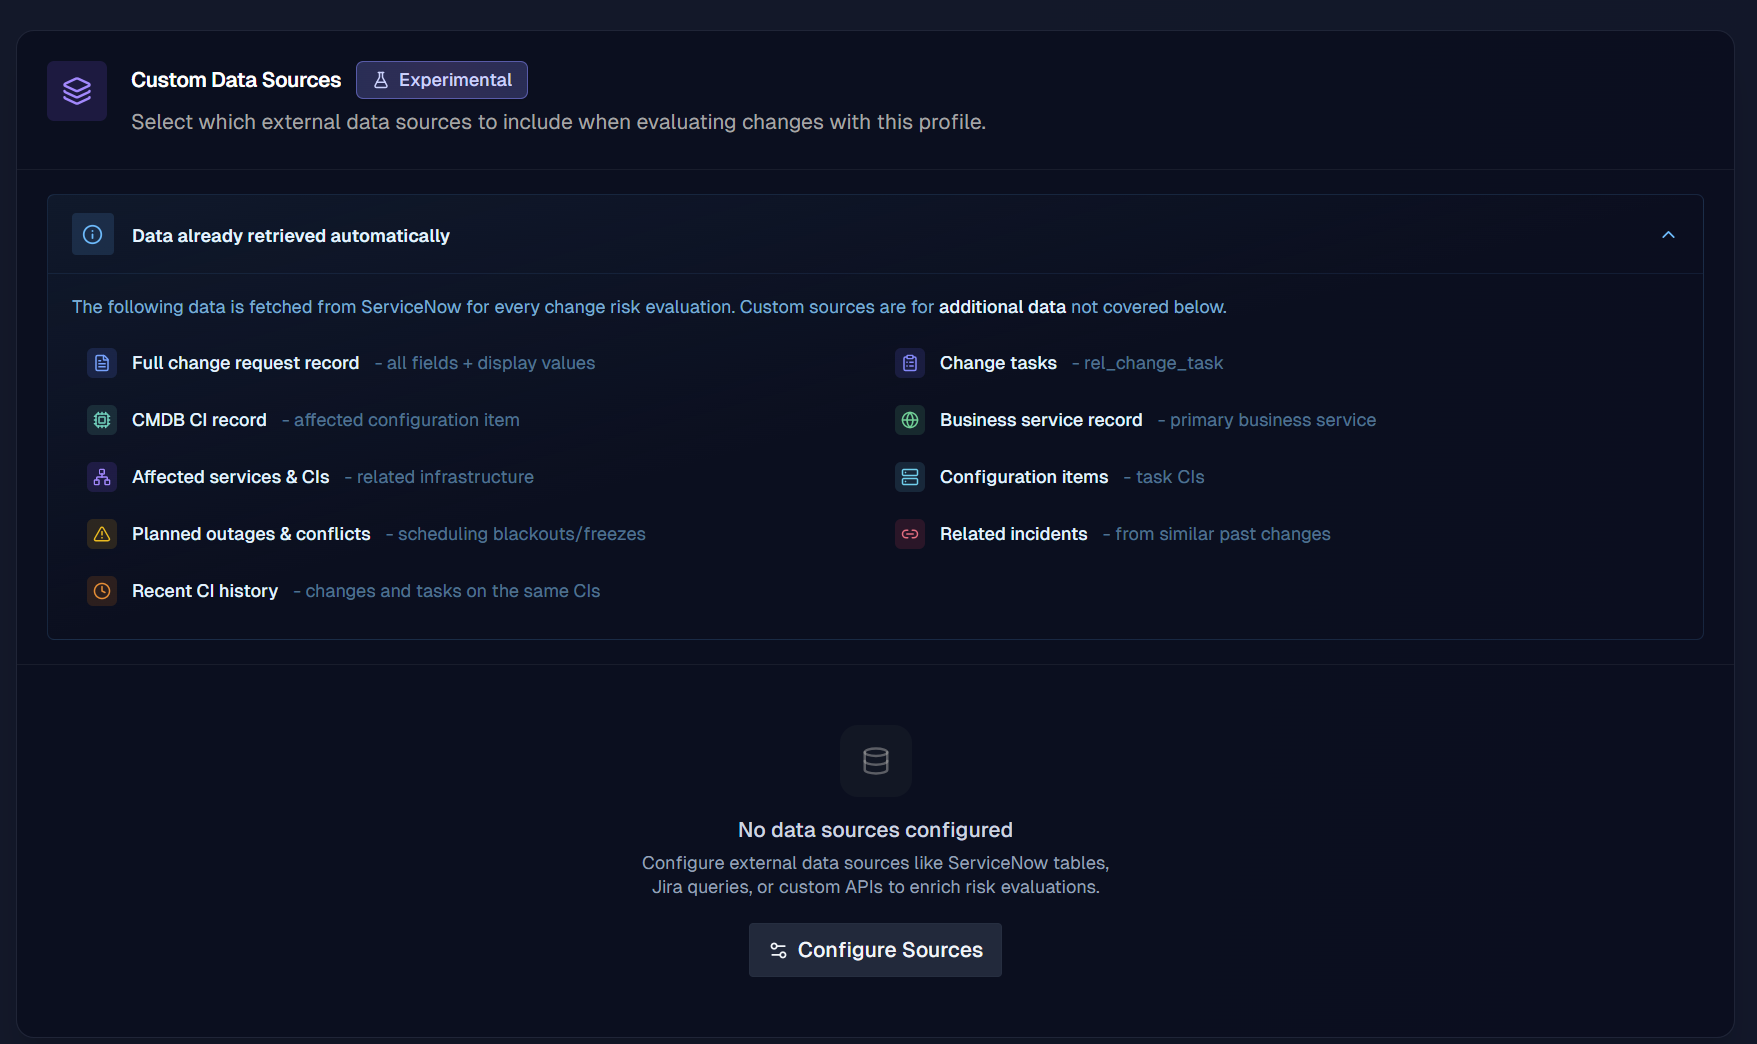
Existing data sources automatically appear at the top of this section. To add a source, click Configure Sources.
In the Custom Data Sources page, click + Add Source.
In the top section of the configuration page, populate the Source Name, Source Type (ServiceNow, Integration, or Custom HTTP), and Description.
Configure the following sections:
Request Configuration
Define the API call to be made for each change risk evaluation.
Depending on which source type you selected, populate the following information:
Source Type | Request Configuration Fields |
|---|---|
ServiceNow | Populate the following fields:
Enable Return Display Values to return a display value. |
Integration | Select an Integration from the drop-down menu. The integration's authentication, base URL, and relay routing will be used for the requests. Specify the HTTP Method, Path, Headers, and Query Parameters. Use |
Custom HTTP | Used for custom data sources. Enter a Base URL and select the Auth Type. You can select from Basic, Bearer, API Key, or Custom Headers. For on-prem APIs, enable the Route via relay client toggle. |
Parameters
Define dynamic values that change per change request.
For example, a parameter cmdbCiSysId mapped to change.cmdb_ci.value lets you query CMDB using the current change's CI. Reference them as {{cmdbCiSysId}} in your request configuration.
To add a parameter, click + Add Parameter. Populate the Parameter Name, Description, and select a Type (Static, Template, or AI) from the drop-down menu.
For Static, enter a fixed value that will be used every time.
For Template, enter a field to map to on the change record (For example, change.number, change.cmdb_ci.value).
For AI (LLM), enter a prompt that describes how the LLM should extract or derive the value from the change description.
Execution Condition (Optional)
Control when the source executes. By default, it runs for every change. Select from the following options:
Always execute - The source executes for every change.
Only when field conditions are met - The source executes when specific properties match. If you select this option, enter a Condition below.
Only when AI determines it is relevant - The source executes when the AI determines the conditions are met, based on a prompt. If you select this option, enter the conditions the LLM should use to evaluate in the prompt.
Response Handling
Configure how the API response is processed before being included in the risk evaluation. Populate the following fields:
Context Label - Short, descriptive name for this data shown to the AI during risk evaluation. (For example,
Jira Related Issues)JSON Path (Optional) - Extract a specific subtree from the JSON response before processing. (For example,
$.resultextracts just theresultarray from a ServiceNow Table API response, reducing noise.)Description for AI - Explanation of what this data represents and how it should be used during risk evaluation. This helps the AI interpret the data correctly.
Large Response Strategy - Choose how to handle large responses.
Select Summarize with AI to allow the AI to summarize the response. You can optionally include Custom Summarization Instructions.
Select Truncate at Character Limit to truncate the response once it has reached the maximum number of characters.
Caching and Options
Toggle on Enable Caching to use caching for requests. Caching avoids repeated API calls when the same parameters resolve to the same values. (For example, multiple changes on the same CI share cached CMDB data)
If you choose to enable caching, set a Timeout in milliseconds. Timeout controls how long to wait for the API response.
Select if you'd like to Continue on failure. Toggle this option on so that a failed source will not block the entire risk evaluation.
Risk Category Weightings
Under Risk Category Weightings, adjust the weight of risk categories. These weightings determine how the final risk score is calculated.
Adjust the weightings using the sliding bar or by typing a number into the box on the right side of each category.
Total weightings
The total of all risk category weightings must equal 100.
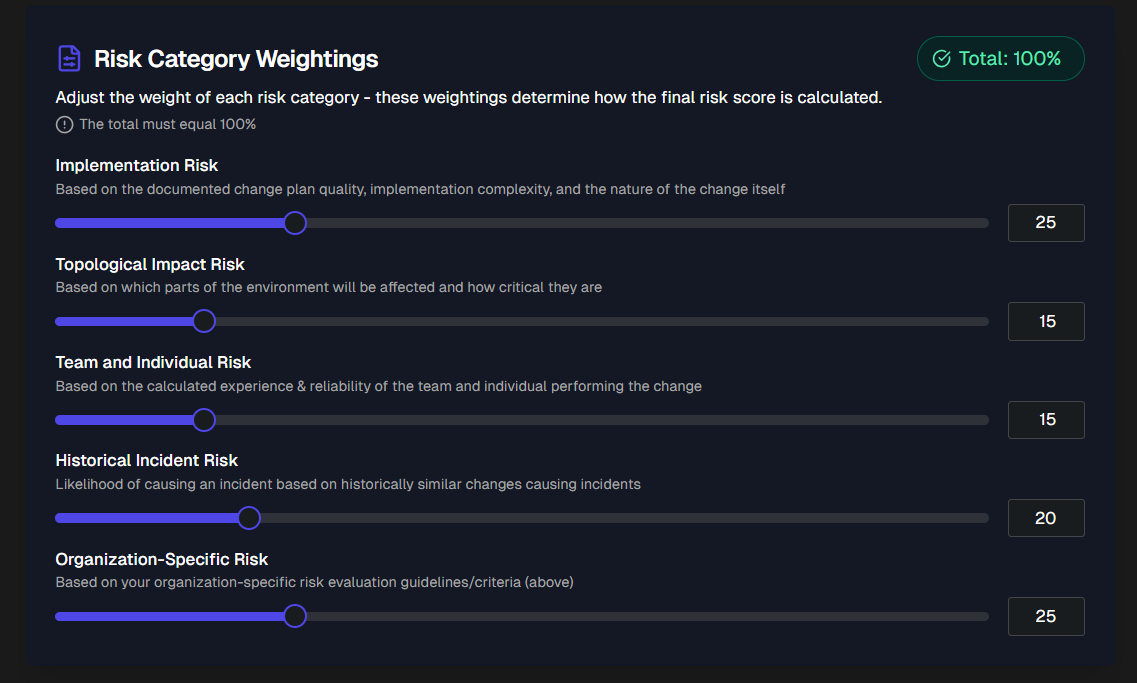
The following risk categories are available:
Risk Category | Description |
|---|---|
Implementation Risk | Documented change plan quality, implementation complexity, and the nature of the change. |
Topological Impact Risk | Which parts of the environment will be affected and how critical they are. |
Team and Individual Risk | The calculated experience level and reliability of the team or individual performing the change. |
Historical Incident Risk | Likelihood of causing an incident based on historically similar changes that caused incidents. |
Organization-Specific Risk | Your organization-specific risk evaluation guidelines or criteria, defined in Evaluation Instructions. |
Field Visibility Settings
In the Field Visibility Settings, determine which fields will appear by default in the Change Risk Dashboard Change Details tab.
User default settings
Individual users can select their own default fields in the Change Details tab. User defaults are user-specific and take precedence over field visibility settings.
Use the toggles to enable or disable Standard Fields, or search for Additional ServiceNow Fields to display.
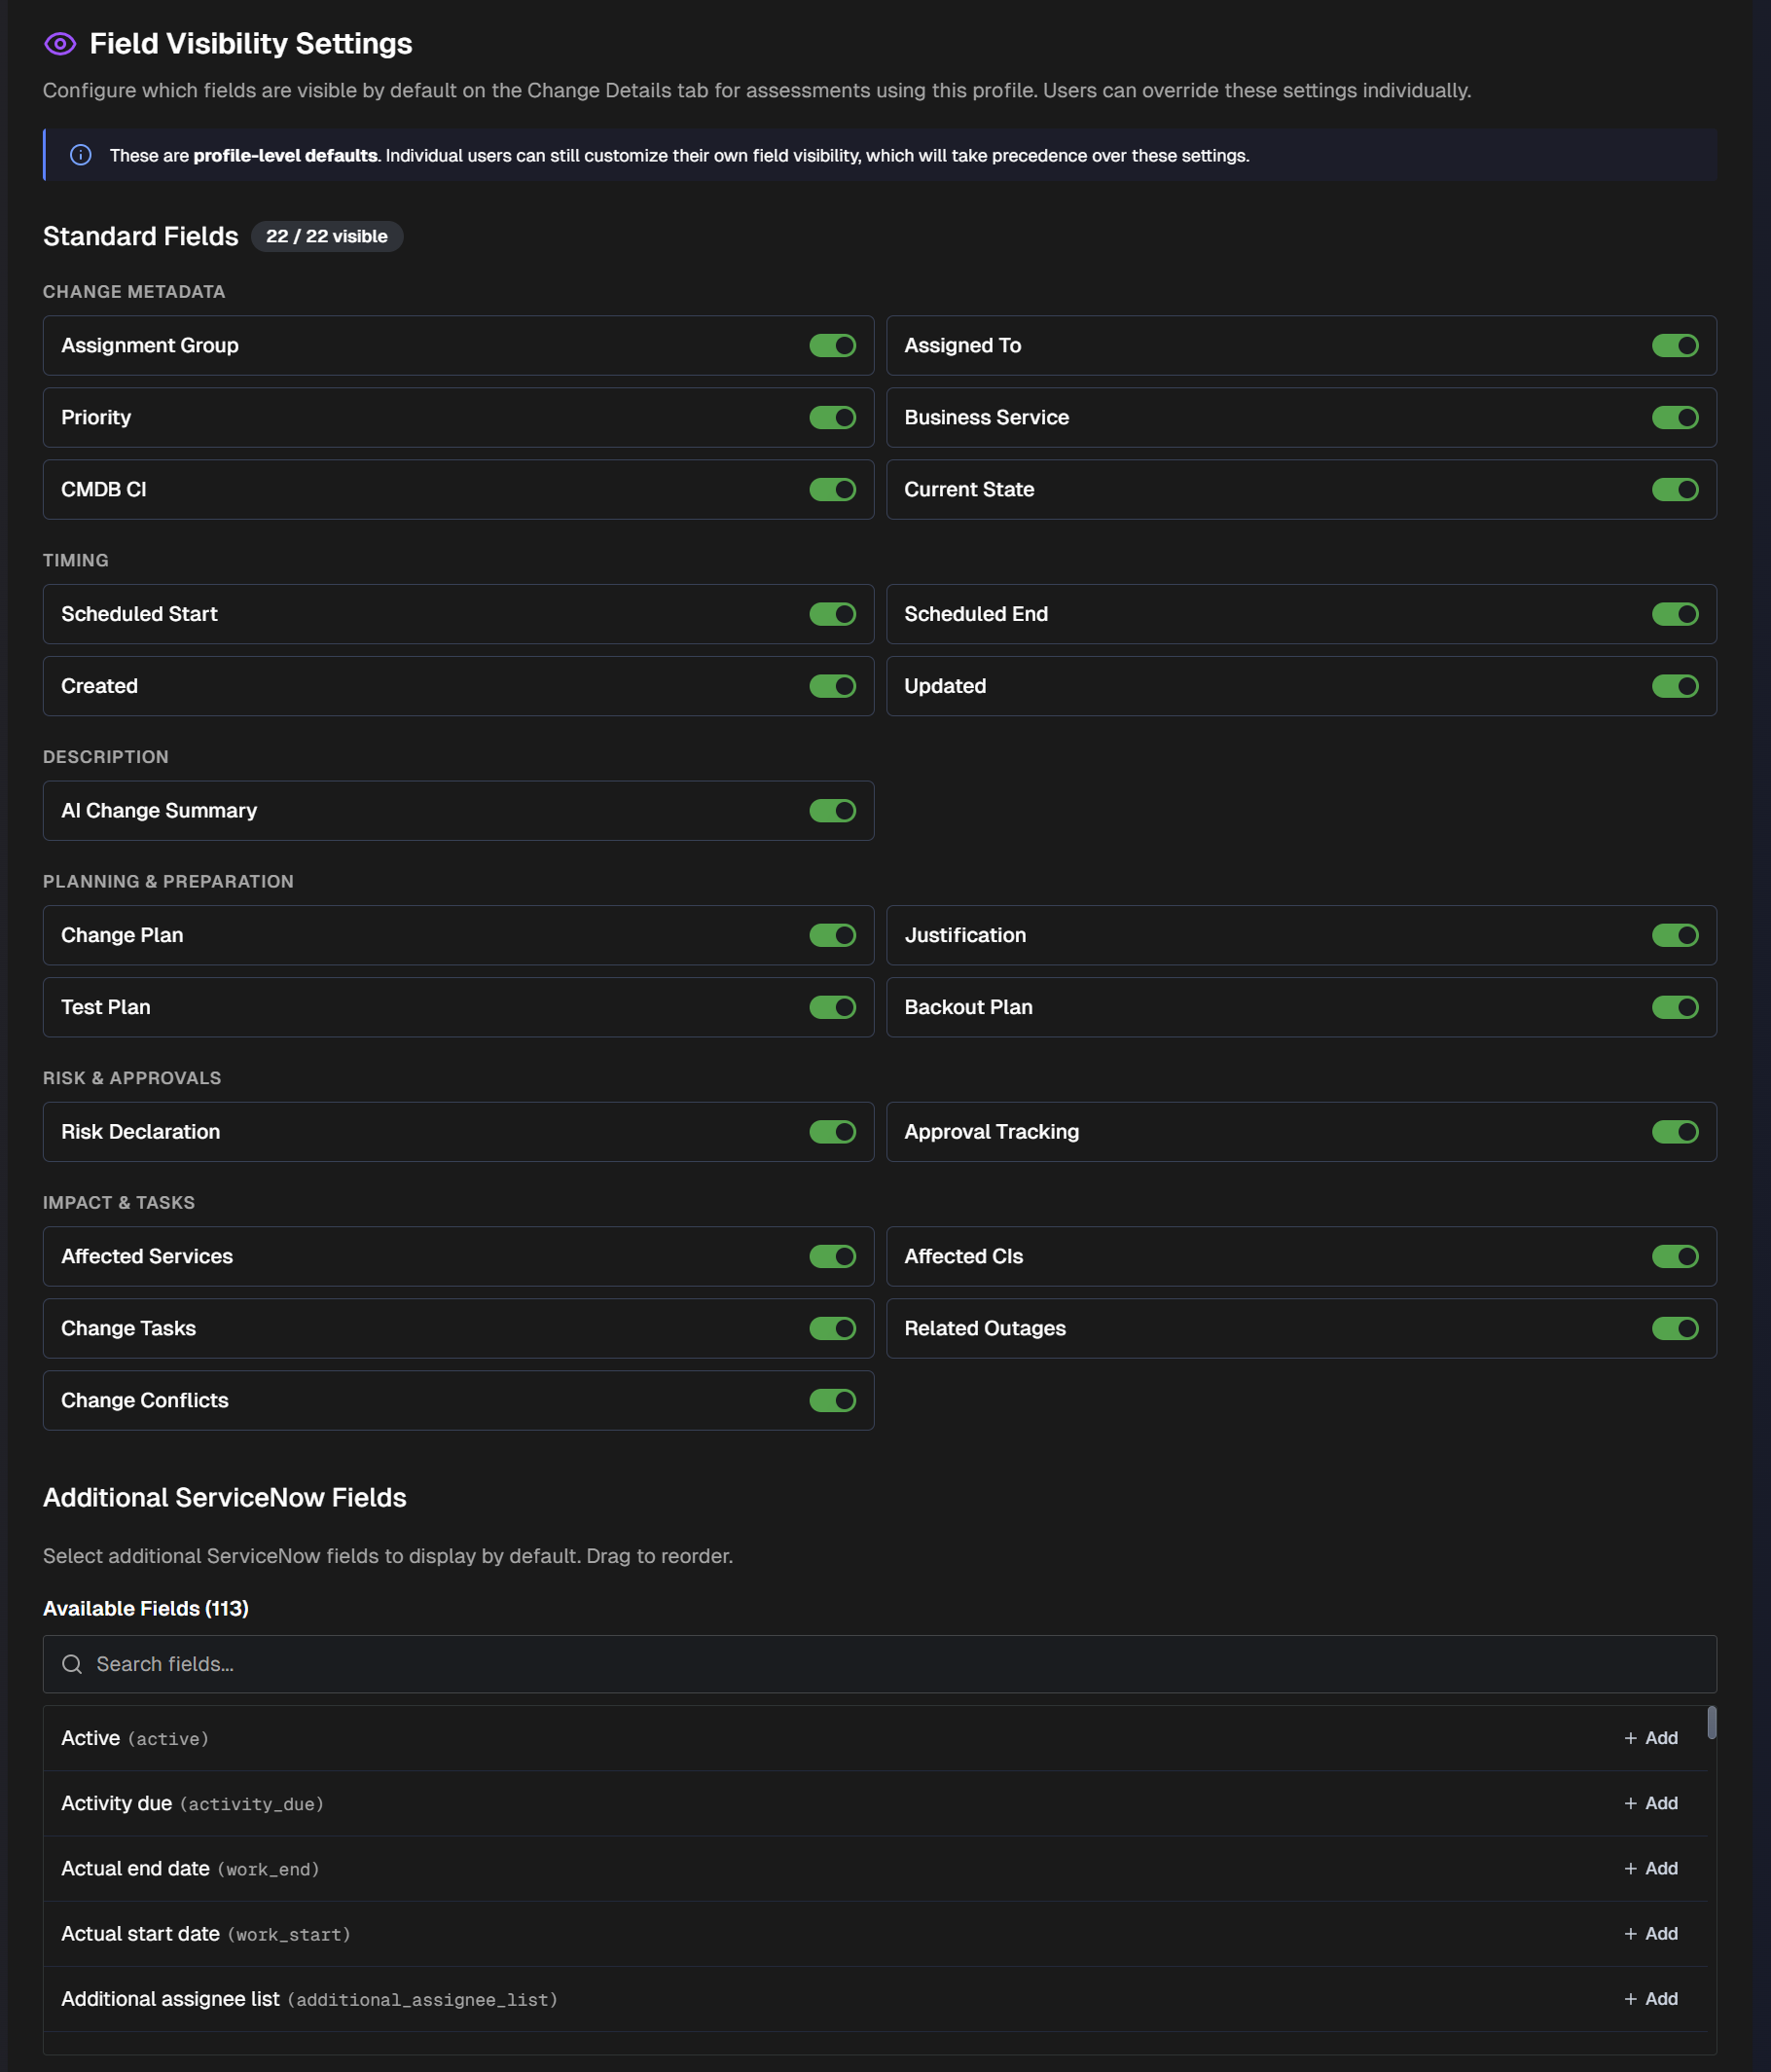
Derived Tags
Under Derived Tags, define reusable tags extracted from each change's data (including free-text fields like the implementation plan) during risk rating. Derived tags become CAB report columns and dashboard filters.
To add a tag, click + Add Derived Tag and define the following:
Field | Description |
|---|---|
Tag key | Enter the tag key using only lowercase letters, numbers, underscores. Permanent once saved. |
Allowed options | Optionally add a comma-separated list of allowed options. When set, extraction only returns values from this list. |
Extraction instructions | Add free-text instructions for extracting the tag. |
CAB Report Defaults
Set default preferences for CAB Report generation. The date range is shared with the dashboard tab. Users can override these settings when generating individual reports.
Configure the following fields:
Field | Description |
|---|---|
Default Mode | Choose the default mode of the report. Select from Simple (Data only) or Enhanced (AI-Powered). |
Default Sort Order | Select the default sort order of the report. Options include Risk Rating, Scheduled Start, or Assignment Group. |
CAB Report ServiceNow Fields | Choose which ServiceNow change fields users can add as columns in CAB reports. |
Dashboard Settings
Under Dashboard Settings, configure how the Change Risk Dashboard appears for users in your organization.
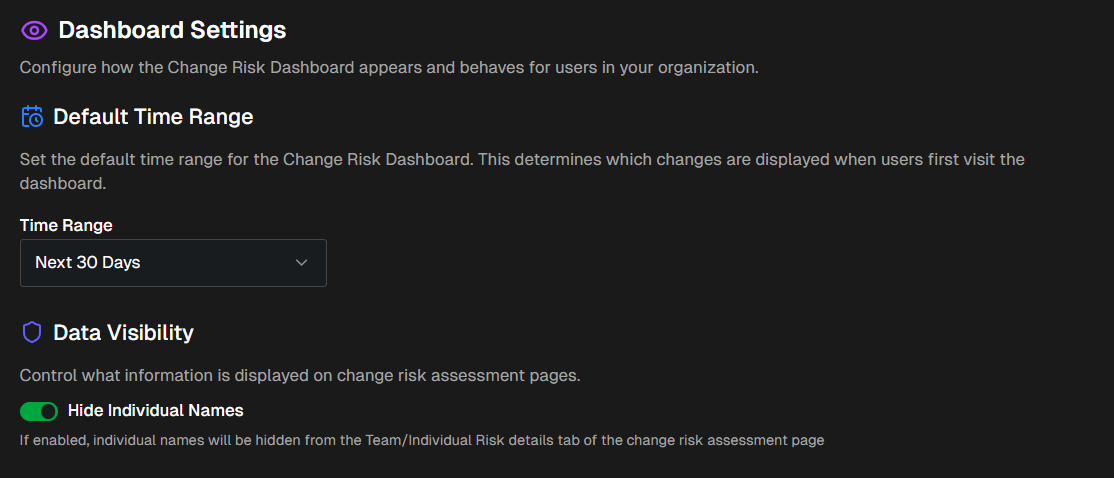
In the Default Time Range section, set the default time range for the Change Risk Dashboard. This determines which changes are displayed when users first visit the dashboard.
In the Data Visibility section, determine what information is displayed on change risk assessment pages. Use the Hide Individual Names toggle to determine whether names will appear in the Team or Individual Risk details tab.
Notification Settings
Under Notification Settings, configure notifications for high-risk changes.
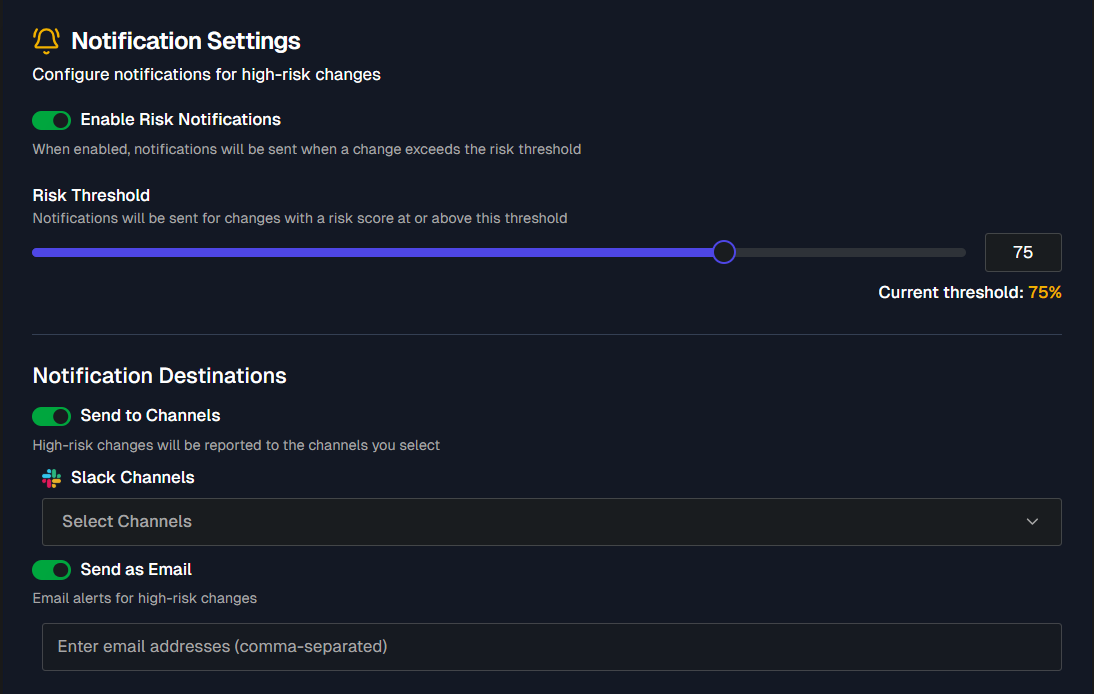
Use the Enable Risk Notifications toggle to determine if notifications will be sent when a change exceeds the risk threshold.
When risk notifications are enabled, you can set the Risk Threshold for when notifications will be sent. Changes with a risk score at or above the threshold will trigger a notification.
Notification Destinations
The Notification Destinations section appears if you've enabled risk notifications.
Toggle Send to Channels on to send high-risk changes to Slack or Teams channels. Use the drop-down menu to select one or more channels to send changes to.
Toggle Send as Email on to send changes to specific email addresses. Enter a comma-separated list of email addresses to receive notifications in the text box.
Category Score Notification Thresholds
You can choose to receive notifications when a risk category score exceeds a specific threshold.
To enable notifications for a specific risk category, click the toggle next to the category name and select the Score Threshold.
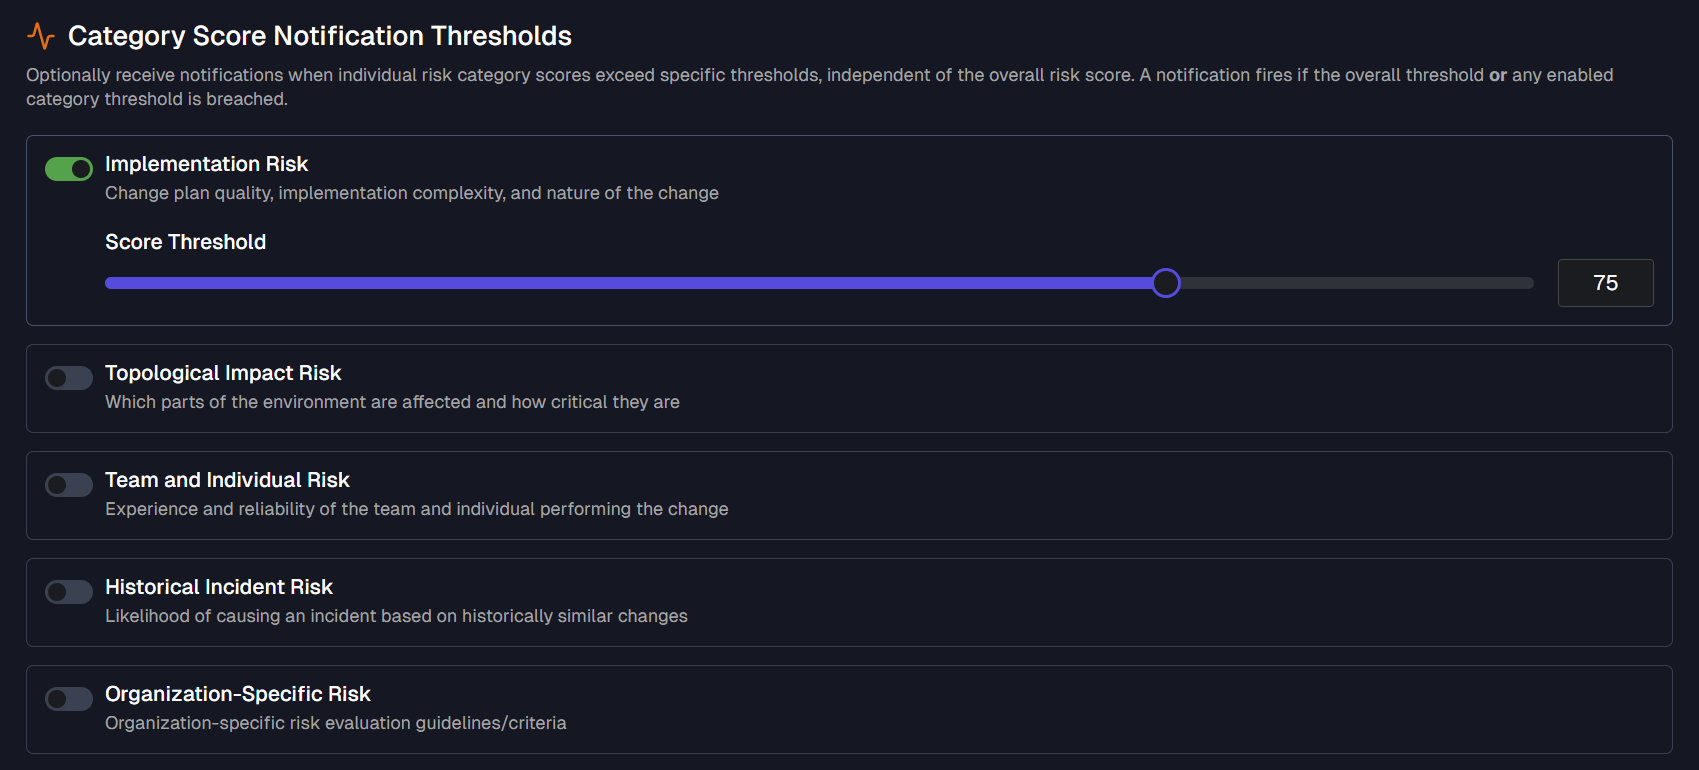
Whenever a category receives a risk score above the threshold, a notification will be sent to the configured notification destination(s).
Post Results to ITSM Record
If ServiceNow is your change tool, you can define where and how analysis outputs are written into change records.
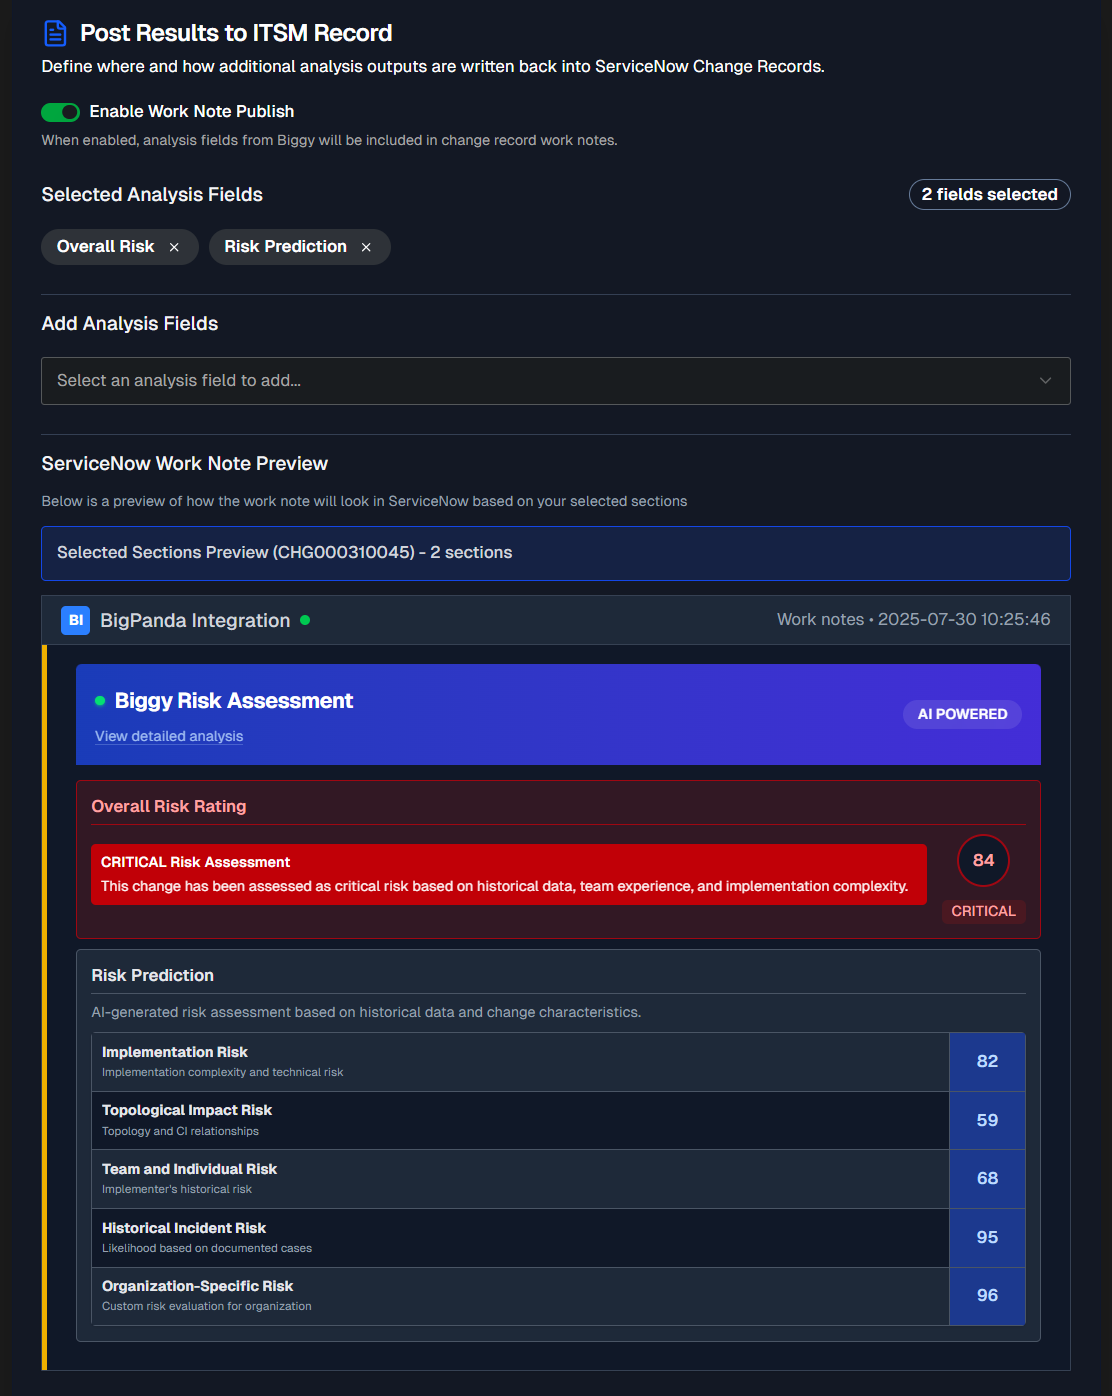
Toggle Enable Work Note Publish on to include analysis fields from Biggy in ServiceNow change record work notes.
In the Risk Threshold section, define the risk score that a change must meet or exceed to be posted to a work note. If the score crosses the threshold again later, a concise update will be appended instead of the full preview.
Click the Add Analysis Fields drop-down to select the fields to be included. The following options are available:
Field | Description |
|---|---|
Overall Risk | Overall risk score and rating for the change. |
Risk Prediction | Analysis of potential risks and outcomes. |
Risk Reasoning | AI-generated reasoning explaining the risk assessment rationale. |
Suggested Mitigations | Recommended actions to reduce identified risks. |
After selecting analysis fields, the ServiceNow Work Note Preview appears.
Global Settings Tab
In the Global Settings tab, configure settings that apply to all change risk profiles. The following can be configured:
Score Scale
By default, risk scores use a 0-100 scale. Set a custom maximum to display scores on a different scale (e.g., 250).
Internal thresholds and risk levels are unaffected. Applies organization-wide, across all profiles.
In the Max Score Override field, enter a different scale. Leave empty to use the standard 100-point scale. Minimum value is 100.
ServiceNow Work Note Limit
Define the maximum number of characters per work note posted back to ServiceNow.
Only raise this after confirming your instance's journal field limit (sys_dictionary max_length). ServiceNow truncates longer entries. Results larger than the limit are always delivered in full as multiple sequential work notes (Part 1 of N, Part 2 of N, ...). Applies organization-wide, across all profiles.
In the Work Note Character Limit field, enter a custom limit. Leave empty to use the ServiceNow-safe 4,000-character default. Minimum value is 1,000.
Change Analytics: CI Grouping
Select which attribute of the affected Configuration Items (CIs) Change Analytics groups changes by. Users can still pick CI Class, CI Category, or CI Subcategory as a Flow Analysis layer for their session. This setting chooses what every viewer sees first.
Choose from the following options:
CI Class - Recommended option. Group by what each CI is (ServiceNow sys_class_name). For example Server, Database, Business Application or Network Device. Required on every CI, so groupings line up with recognizable operational domains.
CI Category - Group by the CI's category tag (ServiceNow ci_category). Optional and governed per instance; choose it when your CMDB keeps categories consistent and meaningful for risk roll-ups.
Change Outcomes
Define which ServiceNow field records how a change finished, and what each of its values means.
Settings updated by BigPanda
These settings can only be changed by BigPanda Technical Admins. Please reach out to your account team if anything in this section needs to be changed.
Change Timing
Define which ServiceNow field records when a change’s work is actually finished.
Settings updated by BigPanda
These settings can only be changed by BigPanda Technical Admins. Please reach out to your account team if anything in this section needs to be changed.